Easy DIY kitchen cabinet update for renters

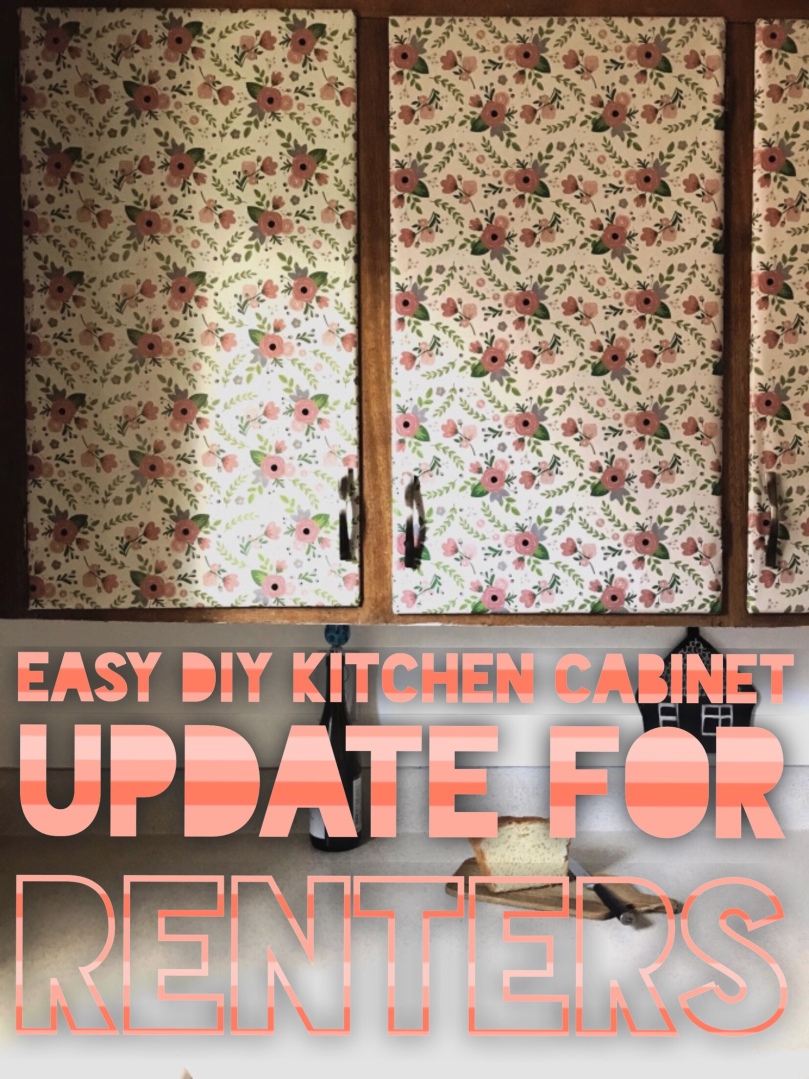
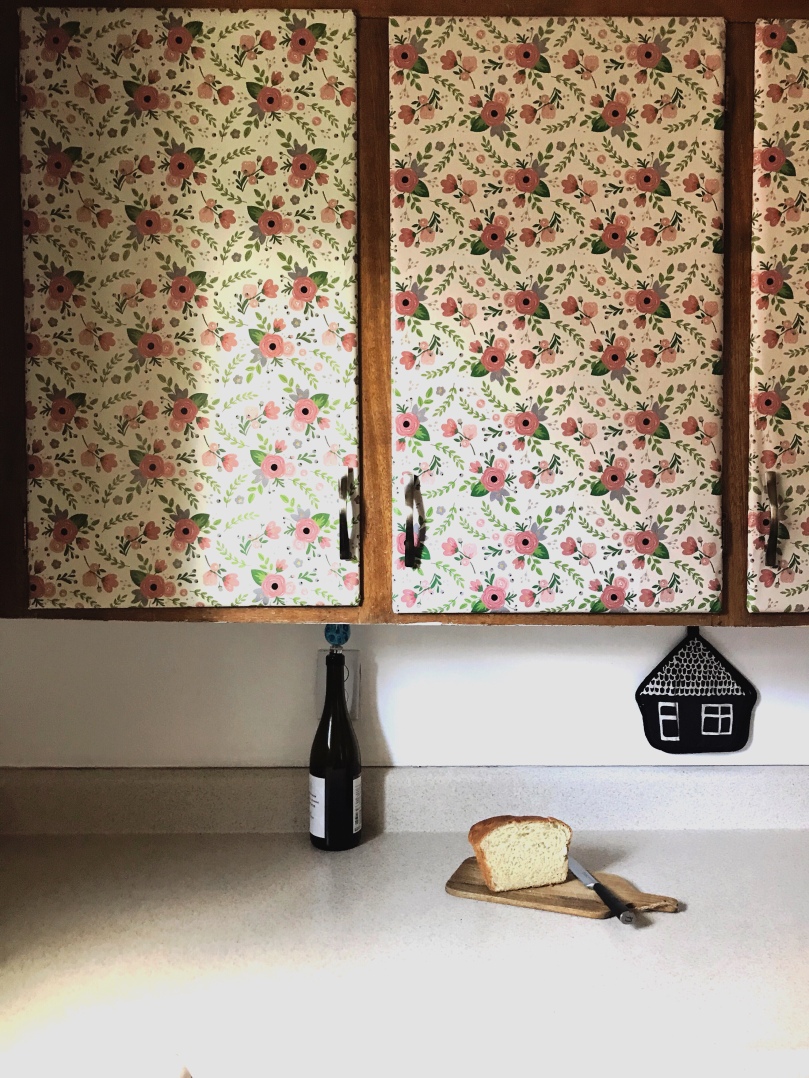
I was tired of looking at my outdated, oh-so-brown cabinets in our rental. With only one tiny window above the sink the space gets very little natural light which makes me not excited to cook in when I’d rather be outside in the sunshine.
Rather than spending lots of time and money painting or putting up peel-off vinyl on my cabinets I went for a much quicker and easier route – wrapping paper!

The entire project took less than 2 hours and cost less than 10 dollars! 

Heres how I did it

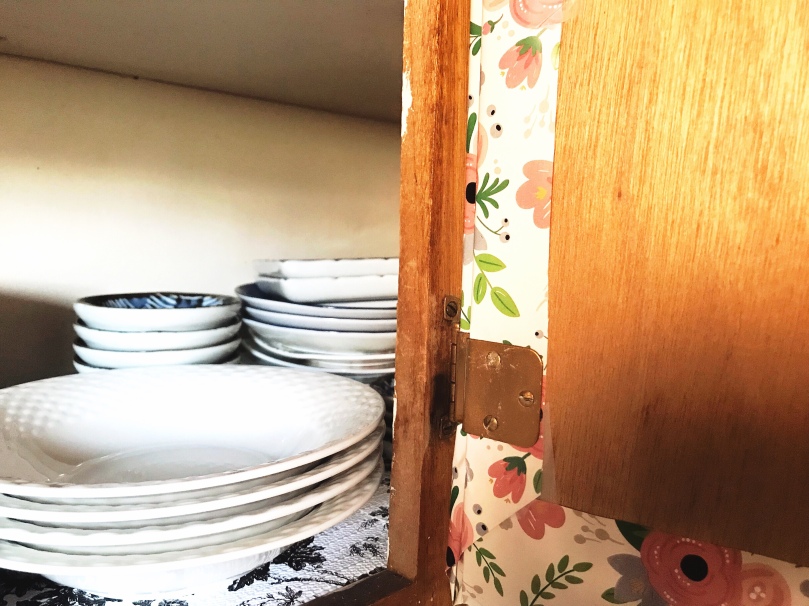
  1. Remove cabinet doors from hinges. Leave the hinges attached to the actual cabinet, this makes it easier to re-hang them. Only take down a few doors at a time to prevent them from getting too mixed up.
  2. Wipe down the doors as you go! I know-cleaning, boo. But trust me, you don’t want to have grime under the paper.
  3. Remove any handles/hardware from the door.
  4. Unroll your wrapping paper and lay the door, outside down, onto the paper. Give yourself at least three inches of paper on each side of the door. Cut the paper to size.
  5. Using Scotch tape, fold up the sides of the paper and tape them down. Fold the corners in the way you would a present and tape them down next.
  6. Re-attach the handles.
  7. Re-attach the door to the hinges still hung on the cabinet. I did some of these on my own but it was much easier to have an extra pair of hands to hold up the door.
  8. Repeat with the rest of the doors.

This was a super quick, easy, and cheap way to make my kitchen more beautiful and unique. I’ve had this paper up for a few months without a hitch. Luckily, I do not have any doors above my stove which could make the paper grimy, more quickly. If you do, I’d still put paper up but just buy enough wrapping paper to switch it out if it gets too bad.

Get creative with your paper choice! At my old apartment I used maps I had collected form roadside stops. It made for great conversation about my travels when friends came over.

Let me know if you try this and how it works!

xoxo,
Kate

JKSignature

Embroidered baby bib 

So my dear friend from college announced he and his wife were expecting! I was so, so excited and immediately could picture what I could make him for a baby gift.

I’ve used this bib pattern many times in the past for shower gifts. Friends and family have told me that it is the most absorbent bib they own (good for teething babies).

After using the Sew She Sews pattern, to make the bib, I sketched out what I had envisioned using a quilting pencil. Then I hand stitched using three strands of embroidery floss in teal and orange. My friend was a huge political activist, and still is, and I would bet his future mini me will be too. The bib is reversible so double the usage!
What do you think?

IMG_1082.JPGIMG_1083.JPGIMG_1081.JPG

DIY EASY WASHI TAPE VALENTINE’S DAY CARDS

It’s been quite some time since Kate or I have posted anything…and we apologize greatly for our lack of love on here! This past winter has been filled with a roller-coaster of events for the both of us, and although we’d like to go in to more detail with you about our recent bloggin’ hiatus, I will have to save this update for another day.

Instead, I’d like to share with you today a few easy ways to create some last-minute Valentine’s Day cards (because we all know how expensive it can be to buy cards for your sweet valentine during this time of year)! Plus, homemade cards make some of the most treasured gifts. I’ve saved a handful of cards over the years that were made with love from friends and family and always enjoy looking back at them.

Here’s what you’ll need:

MATERIALS FOR WASHI TAPE VDAY CARDS | OUR SWEET SOMEWHERE

FYI: The card stock and hearts can be found at any local craft store (Michael’s, AC Moore, and Target). A few other items that aren’t pictured above that will come in handy for you are a pencil, glue gun, and toothpicks (to help keep the glue looking neat).

WASHI TAPE VALENTINE'S DAY CARDS | OUR SWEET SOMEWHERE

Directions:

1. Create a random pattern on a piece of card stock paper with your washi tape. The more wacky your pattern, the better!

2. Then take each heart shape and trace around each one gently with a pencil. Feel free to also free-hand your hearts! Once traced, use your scissor to cut them out.

3. Next, grab some twine and more washi tape to secure the string on to the backs of each heart cut-out.

4. Gather a few of the hearts with twine and tie a secure knot to resemble a small bundle of heart balloons. Grab some more card stock and fold it into a card. Use your already-hot-glue-gun to secure the knot at the base of your heart balloons to the card. Use more glue to secure each heart balloon to your card.

WASHI TAPE VALENTINE'S DAY CARDS | OUR SWEET SOMEWHERE

And voila! Your done. If you have any left over heart cut-outs and some more card stock paper, simply use them to make more Valentine’s day cards. As you can see from the picture below, I used the extra hearts to create very simple designs.

WASHI TAPE VALENTINE'S DAY CARDS | OUR SWEET SOMEWHERE

Oh, and can I just say that washi tape always wins? Because it truly does.

Happy Valentine’s Day!

xoxo,

Jamie

What She Made: DIY Green All-Purpose Cleaner

I’ve got a super easy green, all-purpose cleaner for you to try at home. 

Recently, I’ve been much more aware on what I have been eating and cleaning in order to make both more sustainable and healthy choices. After hearing about how little chemicals are regulated on NPR, I was even more convinced in my switch from harsh chemical cleaners to a more green, all-purpose cleaner.

It takes almost no hands-on time, which makes it an easy switch.

Here’s what you need: 

1 large Mason Jar
2 lemons, halved  – Just save your squeezed lemons, maybe from this recipe!
Enough distilled white vinegar to fill up the Mason Jar
1 spray bottle

Put your left over lemons and vinegar into the Mason Jar and seal. Leave it under your sink or in a cool, dark location for about a month. The vinegar will turn yellow. Once it’s ready, pour it into your spray bottle to about the halfway point and fill the rest up with water. That’s it! Your green all-purpose cleaner is ready to be used.

Easy Green All-Purpose Cleaner | Our Sweet Somewhere

DIY Green All-Purpose Cleaner | Our Sweet Somewhere

When you see your mason jar running a little low, just refill it with some more vinegar. Sometimes I replace my lemons (when I remember to), but I don’t all that often.

Let me know what you think! Also, I would love to hear more green cleaning or eating tips you have.

xoxo,

Kate 


DIY Easy Homemade Cards

We love homemade cards! And although Mother’s Day has already come and gone this year, we wanted to share with you a couple easy ideas to help spark some inspiration for your next DIY homemade card that can be used for any celebration! These cards are so easy and require many items that you might already have on hand. So go ahead and get your craft bins out and start creating!

What Jamie Made:  I did not have to spend an extra penny while making this card since I used items that were already in my craft bin: multi-purpose paper, scrapbook paper, hemp string, colored pencils, washi tape, glue stick/gun, and a thin Sharpie.

DIY Easy Homemade Cards | Our Sweet Somewhere

The paper flowers that you see on the front of the card are from a piece of medium-sized scrapbook paper that had a floral pattern. I cut the flowers out individually from the pattern and then glued them on to the front of the card after drawing/coloring in the stems. To finish it off, I created a little bow from a small piece of hemp and used my glue-gun to adhere it to the base of the stems.

DIY Easy Homemade Cards | Our Sweet Somewhere DIY Easy Homemade Cards | Our Sweet Somewhere DIY Easy Homemade Cards | Our Sweet Somewhere

The personal stamp that you see above is one that I purchased over three years ago from the Rubber Stamp Press Etsy store, and believe it or not, it still works! I highly recommend checking out this shop’s products if you’re looking to personalize your own stamps.

What Kate Made: I made a super easy DIY Mother’s Day card this year for my mama! This same idea would work though for any holiday, birthday, or event. I used foam paper to make the flag banner with Washi tape wrapped around to write the letters. The string is embroidery floss. This card is so quick I was finished it in just a half an hour! 

DIY Card DIY Easy Homeade Cards DIY easy homemad Card

Let us know if you try one of these DIY easy homemade cards for your next event. 

xoxo,

J&K